Behind The Scenes | Philly Is Ugly
Intro
Equipment
I traveled very light while shooting this project. I never wanted to carry more than two cameras, two tripods, and one backpack with some gear. Here is what I carried to every single timelapse location that I shot.
Gear List
Canon 5D MK II
Canon 7D
Canon 24-70mm F2.8L USM Lens.
Canon 70-200m F2.8L IS USM Lens.
Canon 17-40mm F4L Lens.
Canon 50mm F1.4 Lens.
2x Manfrotto Carbon Fibre Tripods
4x SanDisk 16GB Compact Flash Cards.
4x SanDisk 8GB Compact Flash Cards.
2x Intervalometers (Vello Shutterboss Version II Timer Remote)
0.3 and 0.6 Neutral Density Filters.
Umbrella & Plastic for rain protection.
Planning, Inspiration, & Getting Started
Creativity is a funny thing. It seems to come and go as it pleases and never stays put when it arrives. Ideas need to be seized and acted upon. The sooner, the better. Go out and do something.
Why The Name? (“Philly is ugly”)
I got the idea for the “Philly is ugly” time lapse film project in mid-late May of 2013 and immediately started thinking about how I could pull this together and create the best time lapse film this city has even seen.
The name “Philly is ugly” came about as I was casually thinking of some funny or interesting names for the project. I did not want to give it a cliche, or “fluffy” name like “Philly Lights”, or “Philadelphia is Beautiful”, or “Philly, Philly, Philly, Vanilly”, well maybe not that last one, but I knew I wanted to do something different, something that would punch you in the mouth. The more I thought about the name “Philly is ugly”, the more I loved it. “Philly is ugly” will make both those who love and those who hate Philadelphia (surely there isn’t anybody like that out there!) turn and look at the film. If I did my job, the film will show everybody just how beautiful Philadelphia is. It was mildly terrifying sticking with the name, but once I bought the domain name, there was no going back! You will never influence the world by trying to be like it. Step out and do something different. Be daring.
Inspiration
Inspiration for this project was an evolving thing. As I found new locations, I thought of new and interesting angles to shoot. A healthy dose of other timelapse films, and websites likehttp://flickr.com and http://500px.com and http://pinterest.com all provided interesting still photos of unique and beautiful angles of cities around the world that I would try to mimic here in Philadelphia. Getting a great still photo is the first step to getting a great video frame.
The Budget
The first stage of planning was to learn about the equipment I needed (this is my first timelapse) and run the budget. How much gas, parking, and food would cost as well as time taken away from working my “normal” job.
After considering and setting a rough budget ($3,000.00) I began to scout locations around Philadelphia. My scouting process began with a general understanding of the areas of the city that I thought would be cool to include in the film.
Location Scouting
I then used Google Maps to scout the areas of the city that I liked. Google street view was very valuable. I wrote down every location that I liked and created a map overlay in Photoshop and started dropping “pins” on the areas I liked.
After mapping almost 150 locations, I turned to an invaluable iPhone app call “Sunseeker” which allows you to pull up Google maps on your phone with an overlay of the sun’s position in the sky at all times of the day. Using this app I was able to find locations where I could most effectively capture sunrise and sunset. I also considered that the busier areas of the city would appear quiet if I shot them at 5am instead of 7pm. The sun position to the amount of people and activity I wanted at that location were primarily what dictated which locations I shot in the morning and which locations I shot in the evening. See my video on scouting locations below.
Philadelphia
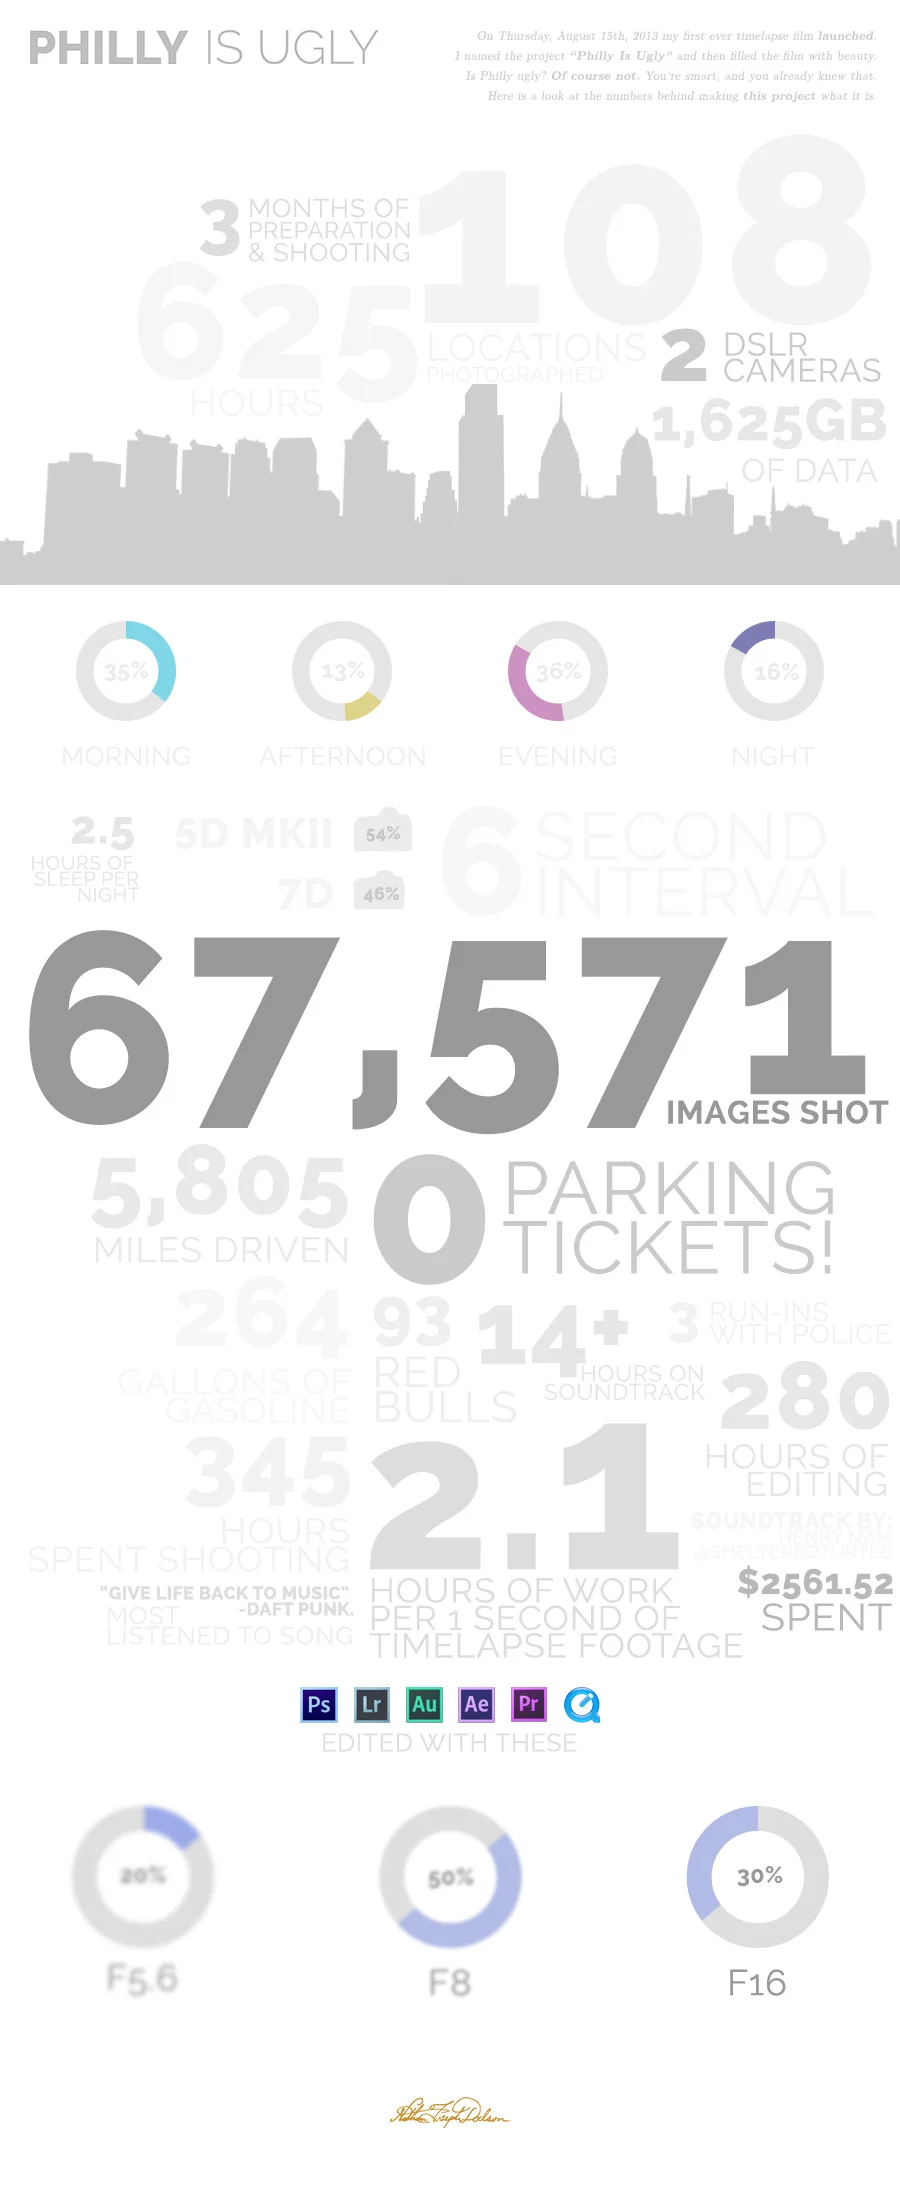
I color coded my Photoshop map of Philadelphia with new pins. The cyan pins are locations best suited for morning shooting, yellow pins for afternoon shooting, pink pins are best for the evening, and purple pins are best for night shots. Armed with this I set two or three locations a day in my schedule, six days a week, for 8 weeks straight. I had spent 5 weeks preparing and shooting could now begin. Check out the map below.
The Photography
Seeing Great Light
With camera in hand, the first thing that I looked for when I arrived at each location was light and angle. What light looked good and what angle did I want to shoot.
Check out the video on looking at light to hear some of my thoughts on seeing good light and getting the shot.
Getting Unique Shots
In addition to seeing the good light you still want to get cool and unique shots that will take people’s breath away. This can be achieved not only by finding unique locations and unique areas to photograph common locations from (get up on bridges, buildings, in the sky, go out on a boat or up in a hot air balloon, hike and climb your way into areas that other people wouldn’t normally go.) You can affect the unique nature of the shot even more by using either a wide angle lens or a zoomed, telephoto lens. Use every tool at your disposal to give the viewers of your film a different look at a location that is common-place.
Camera Settings
Camera settings depend on the light of the location and the look of image you want. Normal principles would apply (i.e. Shallow depth of field means a wide open aperture, or slow the shutter to blur and smooth movement, or shoot at f16 for star shaped headlights or street lights, etc…) just as if you were shooting one image. The one difference is that I would underexpose in the mornings to account for everything getting brighter while I was shooting the sequence and I would overexpose in the evenings to account for everything getting darker. A quick general settings run-down and video about shooting is below.
Shoot in RAW.
White Balance 6000K.
Manual Focus.
Shutter: 1/20th
Aperture: f6.3
ISO: 100
Intervalometer: 300+ photos at a 6 second interval.
24fps & Smooth Timelapse Film
To achieve the beautiful smooth and cinematic look of any kind of film you see, you want to shoot video at 24 frames per second (24fps). This goes for video or timelapse images. I planned on shooting at least 300 frames at each location. This was because 300 frames divided by 24 frames per second equals 12.5 seconds of wonderfully, drool-worthy high quality footage that your friends will be uber jealous of. Shoot and compress to 24fps when you assemble your sequences in post-production (scroll down to learn more about the post production.)
Manual Bulb-Ramping
When shooting longer sequences during the morning or evening when you have rapidly changing light, often you have a swing of three or more stops of light and you need to adjust the camera while shooting the sequence. There is a technique called bulb-ramping and you can buy a device which works to adjust your camera as your shooting your sequences with each image to create a beautiful fade of light. I adjusted my exposure by one stop at a time as I saw that the camera needed to be adjusted. I later used Lightroom or Camera RAW editor to fade the images together over 20 or more frames. It’s kind of hacky, but it gives an interesting fading effect as the camera changes. See my video below to check out the bulb ramping explanation and me using it while shooting a sequence in Philly.
Post-Production & Editing
Once the first sequences have been photographed and you have loaded the image onto your computer and backed them up to another hard drive or disc, you are ready to begin the wonderful process of post-production.
Color Grading & Editing
For the sake of keeping things simple, I am going to stick with using Camera RAW to edit these RAW files. You can just as easily use something like Capture One, Adobe Lightroom, or Apple’s Aperture.
Check out the video below to see a simple process of me editing and applying settings to a sequence of images.
Post Production Manual Bulb-Ramp
This portion goes hand-in-hand a bit with the section earlier on this page about shooting the manual bulb-ramped images. Check out the video below and I will show you what I do to fade images and clips together.
Still Images To Video
Once you have done the editing to your RAW images you are ready to build the timelapse sequences. I used After Effects to convert the dozens of images into one single video clip. These clips will be used later to assemble the film. Check out the video below to see how I assembled the timelapse clips with After Effects.
Cropping & Cinematic Motion
If you don’t have a motorized slider but you want to create shots that have motion you can do a little to help with post-production (Nothing compares to actually shooting with the perfect movement of a dolly or slider). Check out the video below to see how I worked with shots in After Effects that I wanted to give movement to.
Export From After Effects
Once your sequence is lined up and maybe animated too, you need to export some high quality video from After Effects to build clip after clip for your time lapse film. Check out my video below on how I exported my sequences.
Storyboard Your Film To Prep Assembly
Instead of slowly editing video after video after video to figure out what scenes looked best in different places on the film, I approached this part of the project with the idea that I could export a single JPEG for each scene and line them up in a file browser to see what looked best and what colors and architecture and visuals went best when lined up next to each other. See my video below of me exporting and assembling JPEGs to prep for the video editing.
Simple Video Editing with Premiere Pro
I edited this video in Adobe Premiere Pro. Check out my video below to see me talk about some of the things I had in mind for this film as far as editing was concerned and see how I used Premiere for the editing.
Exporting a Final Video
Check out my final settings with me as I prepare to export a short timelapse video from Adobe Premiere Pro.
The Soundtrack:
The key to a great soundtrack is to have a general concept of what you want and find an amazing musician to work with. Henry Nam and I had worked together in the past so it only made sense for me to reach out to a musician of his caliber to collaborate with on this project. The soundtrack is the result of 14 hours of tinkering, messing around, and watching clip after clip of time lapse photography.
A few of my favorite shots not to make the cut:
